Prototype Showcase
Code Implementation
Slingshot.cs
Mounted on the slingshot, implement the highlighting when the slingshot is activated, instantiation of the projectile, and specify the direction and initial velocity of the projectile launch.
					using System.Collections;
using System.Collections.Generic;
using UnityEngine;

public class Slingshot : MonoBehaviour
{
    static public Slingshot S;
    // 在Unity检视面板中设置的字段
    public GameObject prefabProjectile;
    public float velocityMult = 4f;
    public bool _____________________________;
    // 动态设置的字段
    public GameObject launchPoint;
    public Vector3 launchPos;
    public GameObject projectile;
    public bool aimingMode;

    void Awake()
    {
        // 设置Slingshot的单例对象S
        S = this;
        Transform launchPointTrans = transform.Find("LaunchPoint");
        launchPoint = launchPointTrans.gameObject;
        launchPoint.SetActive(false);
        launchPos = launchPointTrans.position;
    }

    void OnMouseEnter()
    {
        print("Slingshot:OnMouseEnter()");
        launchPoint.SetActive(true);
    }

    void OnMouseExit()
    {
        print("Slingshot:OnMouseExit()");
        launchPoint.SetActive(false);
    }

    void OnMouseDown()
    {
        // 玩家在鼠标光标悬停在弹弓上方时按下了鼠标左键
        aimingMode = true;
        // 实例化一个弹丸
        projectile = Instantiate(prefabProjectile) as GameObject;
        // 该实例的初始位置位于launchPoint处
        projectile.transform.position = launchPos;
        // 设置当前的isKinematic属性
        projectile.GetComponent<Rigidbody>().isKinematic = true;
    }

    void Update()
    {
        // 如果弹弓未处于瞄准模式(aimingMode),则跳过以下代码
        if ( !aimingMode ) return;
        // 获取鼠标光标在二维窗口中的当前坐标
        Vector3 mousePos2D = Input.mousePosition;
        // 将鼠标光标位置转换为三维世界坐标
        mousePos2D.z = -Camera.main.transform.position.z;
        Vector3 mousePos3D = Camera.main.ScreenToWorldPoint(mousePos2D);
        // 计算launchPos到mousePos3D两点之间的坐标差
        Vector3 mouseDelta = mousePos3D - launchPos;
        // 将mouseDelta坐标差限制在弹弓的球状碰撞器半径范围内
        float maxMagnitude = this.GetComponent<SphereCollider>().radius;
        if ( mouseDelta.magnitude > maxMagnitude )
        {
            mouseDelta.Normalize();
            mouseDelta *= maxMagnitude;
        }
        // 将Projectile移动到新位置
        Vector3 projPos = launchPos + mouseDelta;
        projectile.transform.position = projPos;

        if ( Input.GetMouseButtonUp(0) )
        {
            // 如果已经松开鼠标
            aimingMode = false;
            projectile.GetComponent<Rigidbody>().isKinematic = false;
            projectile.GetComponent<Rigidbody>().velocity = -mouseDelta * velocityMult;
            FollowCam.S.poi = projectile;
            MissionDemolition.ShotFired();
            ProjectileLine.S.poi = projectile;
            projectile = null;
        }
    }
}
FollowCam.cs
Mounted on the MainCamera, implement smooth camera tracking of the launched projectile, and return to the slingshot viewpoint once the projectile comes to a stop.
					using System.Collections;
using System.Collections.Generic;
using UnityEngine;

public class FollowCam : MonoBehaviour
{
    static public FollowCam S;  // FollowCam的单例对象

    // 在Unity检视面板中设置的字段
    public float easing = 0.01f;
    public Vector2 minXY;
    public bool _____________________________;

    // 动态设置的字段
    public GameObject poi;  // 兴趣点(poi)
    public float camZ;  // 摄像机的z坐标

    void Awake()
    {
        S = this;
        camZ = this.transform.position.z;
    }

    void FixedUpdate()
    {
        Vector3 destination;
        // 如果兴趣点不存在,则返回到P:[0,0,0]
        if ( poi == null )
        {
            destination = Vector3.zero;
        }
        else
        {
            // 获取兴趣点的位置
            destination = poi.transform.position;
            // 如果兴趣点是一个Projectile的实例,检查它是否已经静止
            if ( poi.tag == "Projectile" )
            {
                // 如果它处于sleeping状态(即未移动)
                if ( poi.GetComponent<Rigidbody>().IsSleeping() )
                {
                    // 返回到全部视图
                    poi = null;
                    MissionDemolition.SwitchView("Both");
                    return;
                }
            }
        }

        // 限定x和y的最小值
        destination.x = Mathf.Max(minXY.x, destination.x);
        destination.y = Mathf.Max(minXY.y, destination.y);
        // 在摄像机当前位置和目标位置之间增添插值
        destination = Vector3.Lerp(transform.position, destination, easing);
        // 保持destination.z的值为camZ
        destination.z = camZ;
        // 将摄像机位置设置到destination
        transform.position = destination;
        // 设置摄像机的orthographicSize,使地面始终处于画面之中
        this.GetComponent<Camera>().orthographicSize = destination.y + 10;
    }
}
Goal.cs
Mounted on the light green target within the castle, verify the validity of the projectile touching this area. If the verification is successful, change its transparency to indicate passing through this level.
					using System.Collections;
using System.Collections.Generic;
using UnityEngine;

public class Goal : MonoBehaviour
{
    // 可在代码任意位置访问的静态字段
    static public bool goalMet = false;

    void OnTriggerEnter( Collider other )
    {
        // 当其他物体撞到触发器时
        // 检查是否是弹丸
        if ( other.gameObject.tag == "Projectile" )
        {
            // 如果是弹丸,设置goalMet为true
            Goal.goalMet = true;
            // 同时将颜色的不透明度设置的更高
            Color c = GetComponent<Renderer>().material.color;
            c.a = 0.9f;
            GetComponent<Renderer>().material.color = c;
        }
    }
}
ProjectileLine.cs
Mounted on the parabola, used for drawing the projectile’s parabolic trajectory.
					using System.Collections;
using System.Collections.Generic;
using UnityEngine;

public class ProjectileLine : MonoBehaviour
{
    static public ProjectileLine S;  // 单例对象
    // 在Unity检视面板中设置的字段
    public float minDist = 0.1f;
    public bool _____________________________;

    //在代码中动态设置的字段
    public LineRenderer line;
    private GameObject _poi;
    public List<Vector3> points;

    void Awake()
    {
        S = this;  // 设置单例对象
        // 获取LineRenderer的引用
        line = GetComponent<LineRenderer>();
        // 在需要使用LineRenderer之前,将其禁用
        line.enabled = false;
        // 初始化三维向量点的List
        points = new List<Vector3>();
    }

    // 这是一个属性
    public GameObject poi
    {
        get
        {
            return (_poi);
        }
        set
        {
            _poi = value;
            if ( _poi != null )
            {
                // 当把_poi设置为新对象时,将复位其所有内容
                line.enabled = false;
                points = new List<Vector3>();
                AddPoint();
            }
        }
    }

    // 这个函数用于直接清除线条
    public void Clear()
    {
        _poi = null;
        line.enabled = false;
        points = new List<Vector3>();
    }

    public void AddPoint()
    {
        // 用于在线条上添加一个点
        Vector3 pt = _poi.transform.position;
        if( points.Count > 0 && (pt-lastPoint).magnitude < minDist )
        {
            // 如果该点与上一个点的位置不够远,则返回
            return;
        }
        if ( points.Count==0 )
        {
            // 如果当前是发射点
            Vector3 launchPos = Slingshot.S.launchPoint.transform.position;
            Vector3 launchPosDiff = pt - launchPos;
            // ......则添加一根线条,帮助之后瞄准
            points.Add( pt + launchPosDiff );
            points.Add( pt );
            line.SetVertexCount(2);
            // 设置前两个点
            line.SetPosition(0, points[0] );
            line.SetPosition(1, points[1] );
            // 启用LineRenderer
            line.enabled = true;
        }
        else
        {
            // 正常添加点的操作
            points.Add( pt );
            line.SetVertexCount( points.Count );
            line.SetPosition( points.Count-1, lastPoint );
            line.enabled = true;
        }
    }

    // 返回最近添加的点的位置
    public Vector3 lastPoint
    {
        get
        {
            if ( points == null )
            {
                // 如果当前还没有点,则返回Vector3.zero
                return (Vector3.zero);
            }
            return( points[points.Count - 1] );
        }
    }

    void FixedUpdate()
    {
        if ( poi == null )
        {
            // 如果兴趣点不存在,则找出一个
            if ( FollowCam.S.poi != null )
            {
                if ( FollowCam.S.poi.tag == "Projectile")
                {
                    poi = FollowCam.S.poi;
                }
                else
                {
                    return;  // 如果未找到兴趣点,则返回
                }
            }
            else
            {
                return;  // 如果未找到兴趣点,则返回
            }
        }
        // 如果存在兴趣点,则在FixedUpdate中在其位置上增加一个点
        AddPoint();
        if ( poi.GetComponent<Rigidbody>().IsSleeping() )
        {
            // 当兴趣点静止时,将其清空(设置为null)
            poi = null;
        }
    }
}
CloudCrafter.cs
Mounted on the cloud generator, used to specify the number and type of clouds, randomly instantiate them, and apply the effect of cloud movement.
					using System.Collections;
using System.Collections.Generic;
using UnityEngine;

public class CloudCrafter : MonoBehaviour
{
    // 在Unity检视面板中设置的字段
    public int numClouds = 40;  // 要创建云朵的数量
    public GameObject[] cloudPrefabs;  // 云朵预设的组数
    public Vector3 cloudPosMin;  // 云朵位置的下限
    public Vector3 cloudPosMax;  // 云朵位置的上限
    public float cloudScaleMin = 1;  // 云朵的最小缩放比例
    public float cloudScaleMax = 5;  // 云朵的最大缩放比例
    public float cloudSpeedMult = 0.5f;  // 调整云朵速度
    public bool _____________________________;
    // 在代码中动态设置的字段
    public GameObject[] cloudInstances;

    void Awake()
    {
        // 创建一个cloudInstances数组,用于存储所有云朵的实例
        cloudInstances = new GameObject[numClouds];
        // 查找CloudAnchor父对象
        GameObject anchor = GameObject.Find("CloudAnchor");
        //遍历Cloud_[数字]并创建实例
        GameObject cloud;
        for (int i = 0; i < numClouds; i++)
        {
            // 在0到cloudPrefabs.Length-1之间选择一个整数
            // Random.Range返回值中不包含范围上限
            int prefabNum = Random.Range(0, cloudPrefabs.Length);
            // 创建一个实例
            cloud = Instantiate(cloudPrefabs[prefabNum]) as GameObject;
            // 设置云朵位置
            Vector3 cPos = Vector3.zero;
            cPos.x = Random.Range(cloudPosMin.x, cloudPosMax.x);
            cPos.y = Random.Range(cloudPosMin.y, cloudPosMax.y);
            // 设置云朵缩放比例
            float scaleU = Random.value;
            float scaleVal = Mathf.Lerp(cloudScaleMin, cloudScaleMax, scaleU);
            // 较小的云朵(即scaleU较小)离地面较近
            cPos.y = Mathf.Lerp(cloudPosMin.y, cPos.y, scaleU);
            // 较小的云朵距离较远
            cPos.z = 100 - 90 * scaleU;
            // 将上述变换数值应用到云朵
            cloud.transform.position = cPos;
            cloud.transform.localScale = Vector3.one * scaleVal;
            // 使云朵成为CloudAnchor的子对象
            cloud.transform.parent = anchor.transform;
            // 将云朵添加到CloudInstances数组中
            cloudInstances[i] = cloud;
        }
    }

    void Update()
    {
        // 遍历所有已创建的云朵
        foreach (GameObject cloud in cloudInstances)
        {
            // 获取云朵的缩放比例和位置
            float scaleVal = cloud.transform.localScale.x;
            Vector3 cPos = cloud.transform.position;
            //云朵越大,移动速度越快
            cPos.x -= scaleVal * Time.deltaTime * cloudSpeedMult;
            // 如果云朵已经位于画面左侧较远位置
            if ( cPos.x<=cloudPosMin.x )
            {
                // 则将它放置到最右侧
                cPos.x = cloudPosMax.x;
            }
            // 将新位置应用到云朵上
            cloud.transform.position = cPos;
        }
    }
}
MissionDemolition.cs
Mounted on the MainCamera, implement level and scene transitions, game judgement, UI updates, and top button view switches.
using System.Collections;
using System.Collections.Generic;
using UnityEngine;
public enum GameMode
{
idle,
playing,
levelEnd
}
public class MissionDemolition : MonoBehaviour
{
static public MissionDemolition S; // 单例对象
// 在Unity检视面板中设置的字段
public GameObject[] castles; // 存储所有城堡对象的数组
public GUIText gtLevel; // GT_Level界面文字
public GUIText gtScore; // GT_Score界面文字
public Vector3 castlePos; // 放置城堡的位置
public bool _____________________________;
// 在代码中动态设置的变量
public int level; // 当前级别
public int levelMax; // 级别的数量
public int shotsTaken;
public GameObject castle; // 当前城堡
public GameMode mode = GameMode.idle;
public string showing = "Slingshot"; // 摄像机的模式
void Start()
{
S = this; // 定义单例对象
level = 0;
levelMax = castles.Length;
StartLevel();
}
void StartLevel()
{
// 如果已有城堡存在,则清除原有城堡
if (castle != null)
{
Destroy(castle);
}
// 清除原有的弹丸
GameObject[] gos = GameObject.FindGameObjectsWithTag("Projectile");
foreach (GameObject pTemp in gos)
{
Destroy(pTemp);
}
// 实例化新城堡
castle = Instantiate( castles[level] ) as GameObject;
castle.transform.position = castlePos;
shotsTaken = 0;
// 重置摄像机位置
SwitchView("Both");
ProjectileLine.S.Clear();
// 重置目标状态
Goal.goalMet = false;
ShowGT();
mode = GameMode.playing;
}
void ShowGT()
{
// 设置界面文字
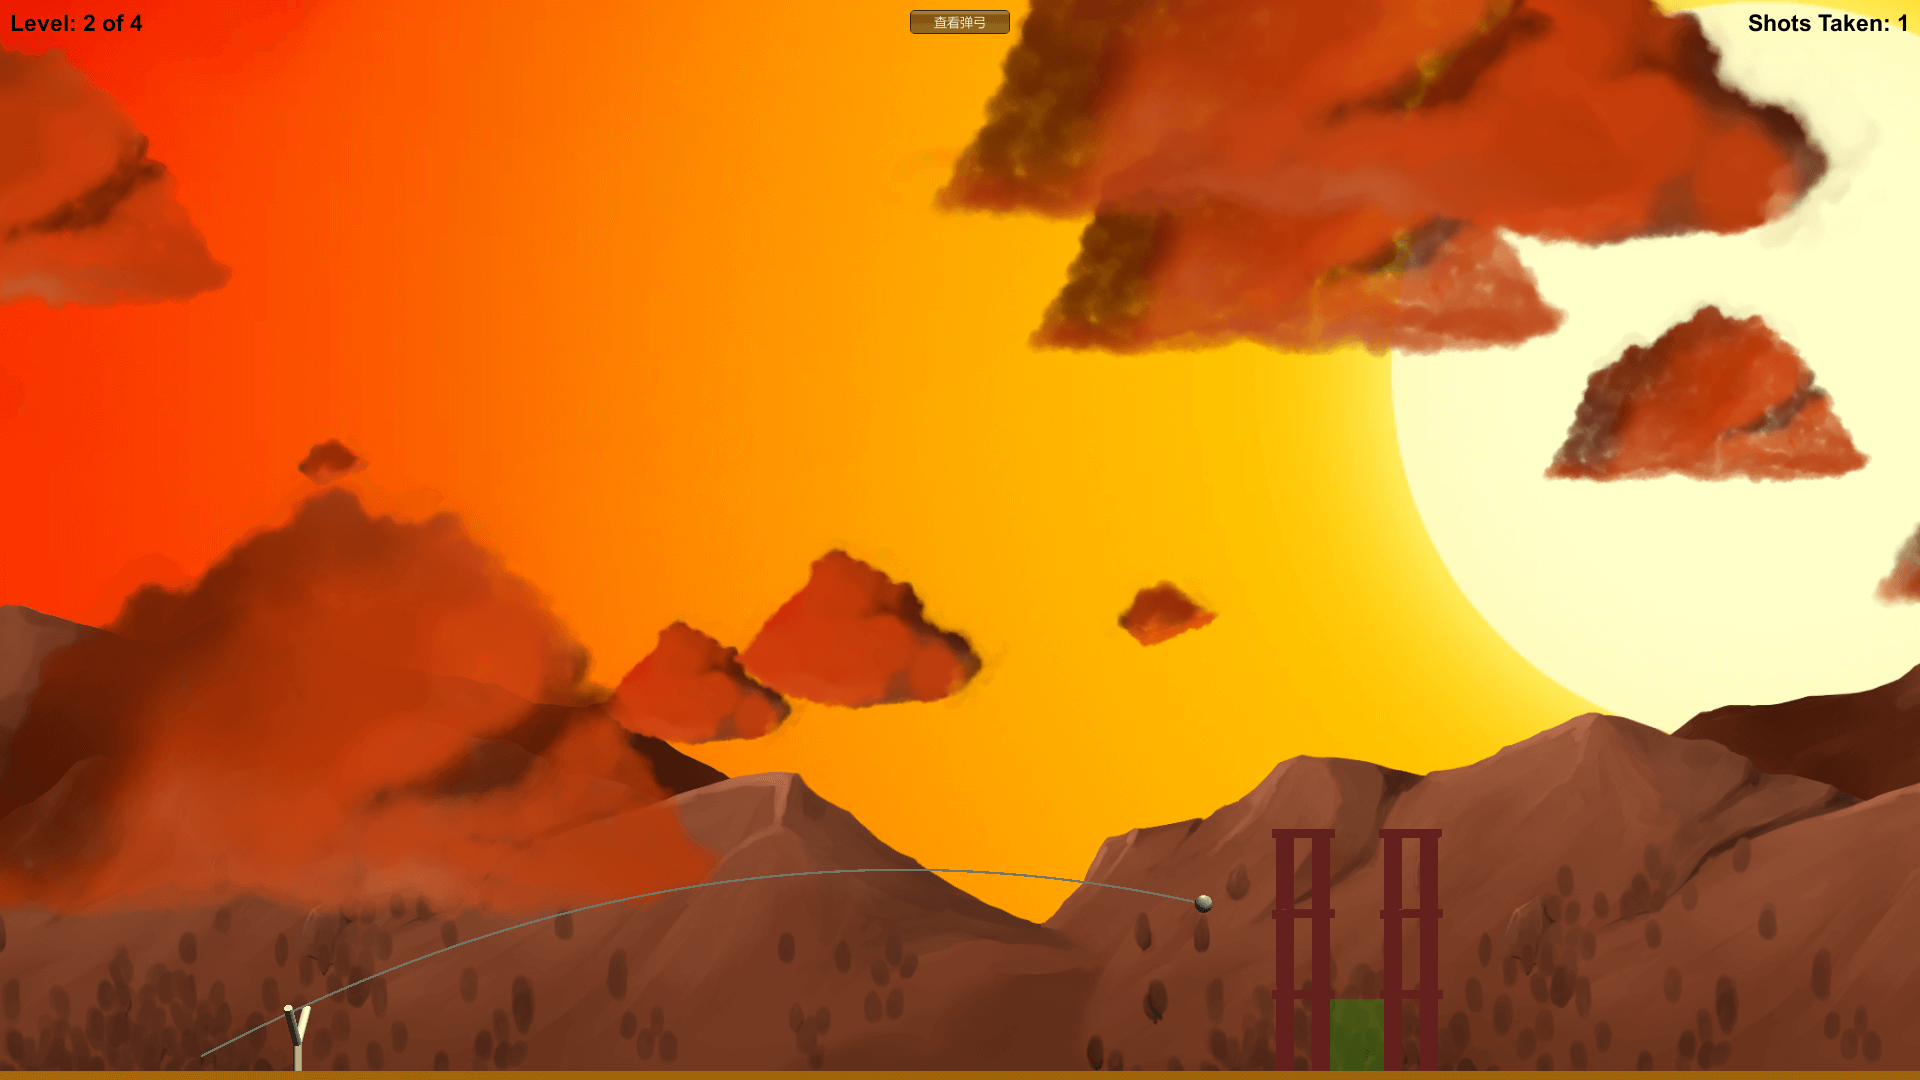
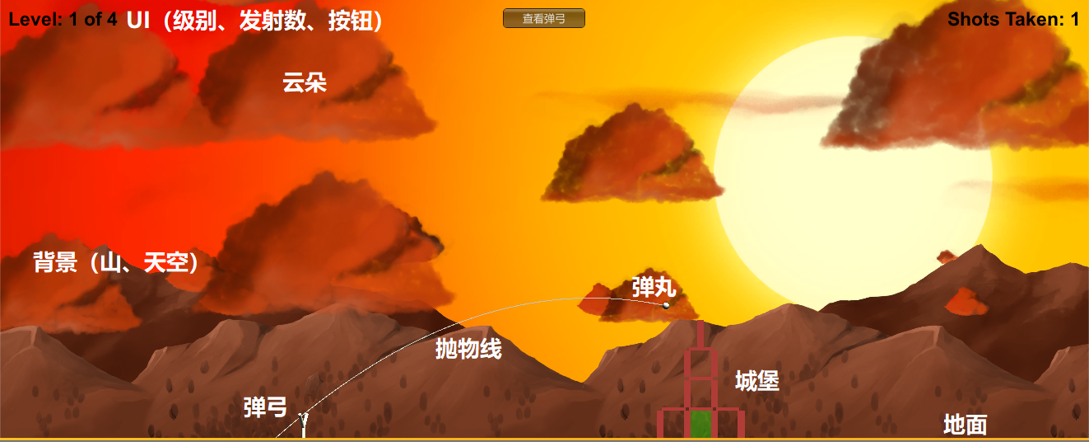
gtLevel.text = "Level: " + (level + 1) + " of " + levelMax;
gtScore.text = "Shots Taken: " + shotsTaken;
}
void Update()
{
ShowGT();
// 检查是否已经完成该级别
if (mode == GameMode.playing && Goal.goalMet)
{
// 当完成该级别时,改变mode,停止检查
mode = GameMode.levelEnd;
// 缩小画面比例
SwitchView("Both");
// 在2秒后开始下一级别
Invoke("NextLevel", 2f);
}
}
void NextLevel()
{
level++;
if (level == levelMax)
{
level = 0;
}
StartLevel();
}
void OnGUI()
{
// 在屏幕顶端绘制用户界面按钮,用于切换视图
Rect buttonRect = new Rect((Screen.width / 2) - 50, 10, 100, 24);
switch(showing)
{
case "Slingshot":
if ( GUI.Button(buttonRect, "查看城堡") )
{
SwitchView("Castle");
}
break;
case "Castle":
if (GUI.Button(buttonRect, "查看全部"))
{
SwitchView("Both");
}
break;
case "Both":
if (GUI.Button(buttonRect, "查看弹弓"))
{
SwitchView("Slingshot");
}
break;
}
}
// 允许在代码任意位置切换视图的静态方法
static public void SwitchView(string eView)
{
S.showing = eView;
switch (S.showing)
{
case "Slingshot":
FollowCam.S.poi = null;
break;
case "Castle":
FollowCam.S.poi = S.castle;
break;
case "Both":
FollowCam.S.poi = GameObject.Find("ViewBoth");
break;
}
}
// 允许在代码任意位置增加发射次数的代码
public static void ShotFired()
{
S.shotsTaken++;
}
}
Project Challenges
Physics Simulation
Problem Description
How to launch a projectile so that it can fly normally. How to achieve normal physical interaction between the projectile and the ground.
Problem Analysis
- Assign an initial velocity with direction to the projectile.
- Assign physical materials to the projectile and the ground.
Solution
First, use vector calculations. Compute the difference (MouseDelta) between the slingshot launch point (launchPos) and the mouse position (MousePos). This difference will be limited within the radius range of the spherical collider (this.GetComponent<SphereCollider>().). Finally, multiply this interpolation by the set initial velocity (velocityMult) and assign it to the rigidbody component of the projectile, allowing the projectile to simulate physical effects while flying. Secondly, assign physical materials to the projectile and the ground. The projectile’s material needs to use continuous collision detection (Collision Detection > Continuous), while the ground’s material needs to use bounciness (Bounciness=1).
Final Result
Camera Smooth Tracking
Problem Description
If the camera only follows the position of the projectile, the scene will appear mechanical and may be accompanied by lag and instability.
Problem Analysis
- Pure position following cannot achieve smooth tracking, resulting in a segmented-looking trajectory.
- The update frequency of physics simulation is different from that of screen refresh rate.
Solution
Firstly, adopt interpolation. The Vector3.Lerp() method returns the linear interpolation position between two points, taking the weighted average of the two point positions. Code: destination = Vector3.Lerp(transform.position, destination, easing); The “easing” parameter represents the weight value of Vector3.Lerp(). When easing = 0.01, Unity moves the camera from the current position (transform.position) to the destination position, moving 1% of the distance per frame. This is a non-time-based linear interpolation method. Secondly, since the Update() method is called according to the computer’s maximum frame rate, while the physics simulation update frequency is 50 frames per second, this difference causes significant screen lag and instability, especially on high-performance computers. Changing the Update() method to FixedUpdate() can fix the screen refresh rate at 50 FPS, consistent with the physics simulation update frequency.
Final Result
Relative Motion Illusion and Sense of Speed
Problem Description
When the projectile is fired to a high altitude, the camera can only track the projectile flying in the sky, making it difficult to perceive the speed of the projectile.
Problem Analysis
- The camera’s original orthographic view angle, orthographicSize=4, causes the ground to leave the camera’s field of view when the projectile is too high.
- The projectile lacks a reference point for motion.
Solution
Firstly, limit the coordinates x and y of the projectile target destination and dynamically adjust the camera’s orthographic view angle, orthographicSize. The code is: this.GetComponent<Camera>().orthographicSize = destination.y + 10. Secondly, adopt the parallax scrolling method. In 2D games, parallax scrolling makes foreground objects pass quickly, while background objects move more slowly relative to the main camera. In this project, I downloaded some free resources from the Unity Asset Store. The resources included cloud materials, which were randomly arranged in the sky using the CloudCrafter.cs script, creating a simple illusion of relative motion. The z-axis coordinates of the clouds correspond to randomly generated Scale, interspersed among the background mountains. The projectile passes between two semi-transparent clouds with different speeds, creating a parallax scrolling effect.
Final Result
